Showing posts with label bars. Show all posts

Wednesday, 3 September 2014

Pear and salted caramel squares


While you are reading this, I'm off enjoying the last few precious days of my annual leave entitlement this year. And doing it in great company as one of my bestest friends in the world is visiting. We are probably sitting somewhere enjoying afternoon tea. Or doing something else, but most likely it's very much food related. So I didn't want you to be without some goodies as well, hence sharing this recipe which I made a while ago, but it just got stuck in the queue of things to post.

A while ago I posted not one, but two recipes for salted caramel. As much as I love salted caramel, I didn't make it just to eat it with a spoon straight from the jar (although a large amount of the caramel did suffer that fate). I actually made it for these amazing pear squares, which I have adapted from a recipe for Apple Pie Bars from Sally's Baking Addiction. I used pear as that was what I happened to take out of the freezer. Note to self, frozen apple and pear look very similar if they aren't labelled appropriately. I have learned my lesson, and have been much more diligent with my labelling pen and masking tape this year. But this time it turned out to be a very lucky coincidence as the squares turned out really good.

Pear and Salted Caramel Squares (makes 16 squares):
Crust:
115 g unsalted butter, melted
50 g sugar
1 tsp vanilla extract
1/4 tsp salt
125 g all purpose flour

Pear filling:
about 2 cups of cubed pear (if using frozen, defrost and drain well before using)
1-2 tsp cinnamon
1/2 tsp nutmeg, cloves or ground ginger depending on preference (or a bit of each...)
(optional: a tbsp or two of stewed pear)

Crumble:
40g oats
70 g muscovado sugar (I prefer light to dark for this bake)
30 g all purpose flour
60 g butter
home made salted caramel

The Howto:
Preheat the oven to 150 degrees C (300 degrees F). Line a 8x8 in (20x20 cm) baking tin with parchment paper. Prepare the crust by mixing all ingredients but the flour, and then adding flour, mixing only enough to get a smooth dough. Press into the baking tin, and bake for 15 minutes.

While the crust is baking, prepare the filling and crumble. For the filling, mix the pear with the spices. You could add sugar if you want to, but I think it was perfect without any added sugar. To prepare the crumble mix oats, sugar and flour in a bowl. Cut the butter into cubes, and rub it into the oat and flour mix until you get a consistency of coarse sand.

When the crust has baked, increase the oven temperature to 175 degrees C (350 degrees F). Spread the stewed pears and then pear chunks in an even layer onto the crust, and top with crumble. Bake for another 30-35 minutes until the crumble is golden brown.

Let cool completely, first in room temperature and then for at least 2 hours in the fridge. Drizzle with salted caramel and cut into 16 squares.


The Verdict:
I have already made these bars twice, that's how good they are. I'm sure the original version with apples is amazing, but I think my pear one worked really well, and as I said, I omitted the sugar from the filling as I didn't want them to be overly sweet. Together with the delicious home made salted caramel they make such a perfect combination. I enjoyed the squares best when room temperature, but they were also good when eaten warm with some vanilla ice cream. I was going to put some of them into the freezer, but not all too surprisingly there weren't any left when I was going to freeze them.


Saturday, 15 February 2014

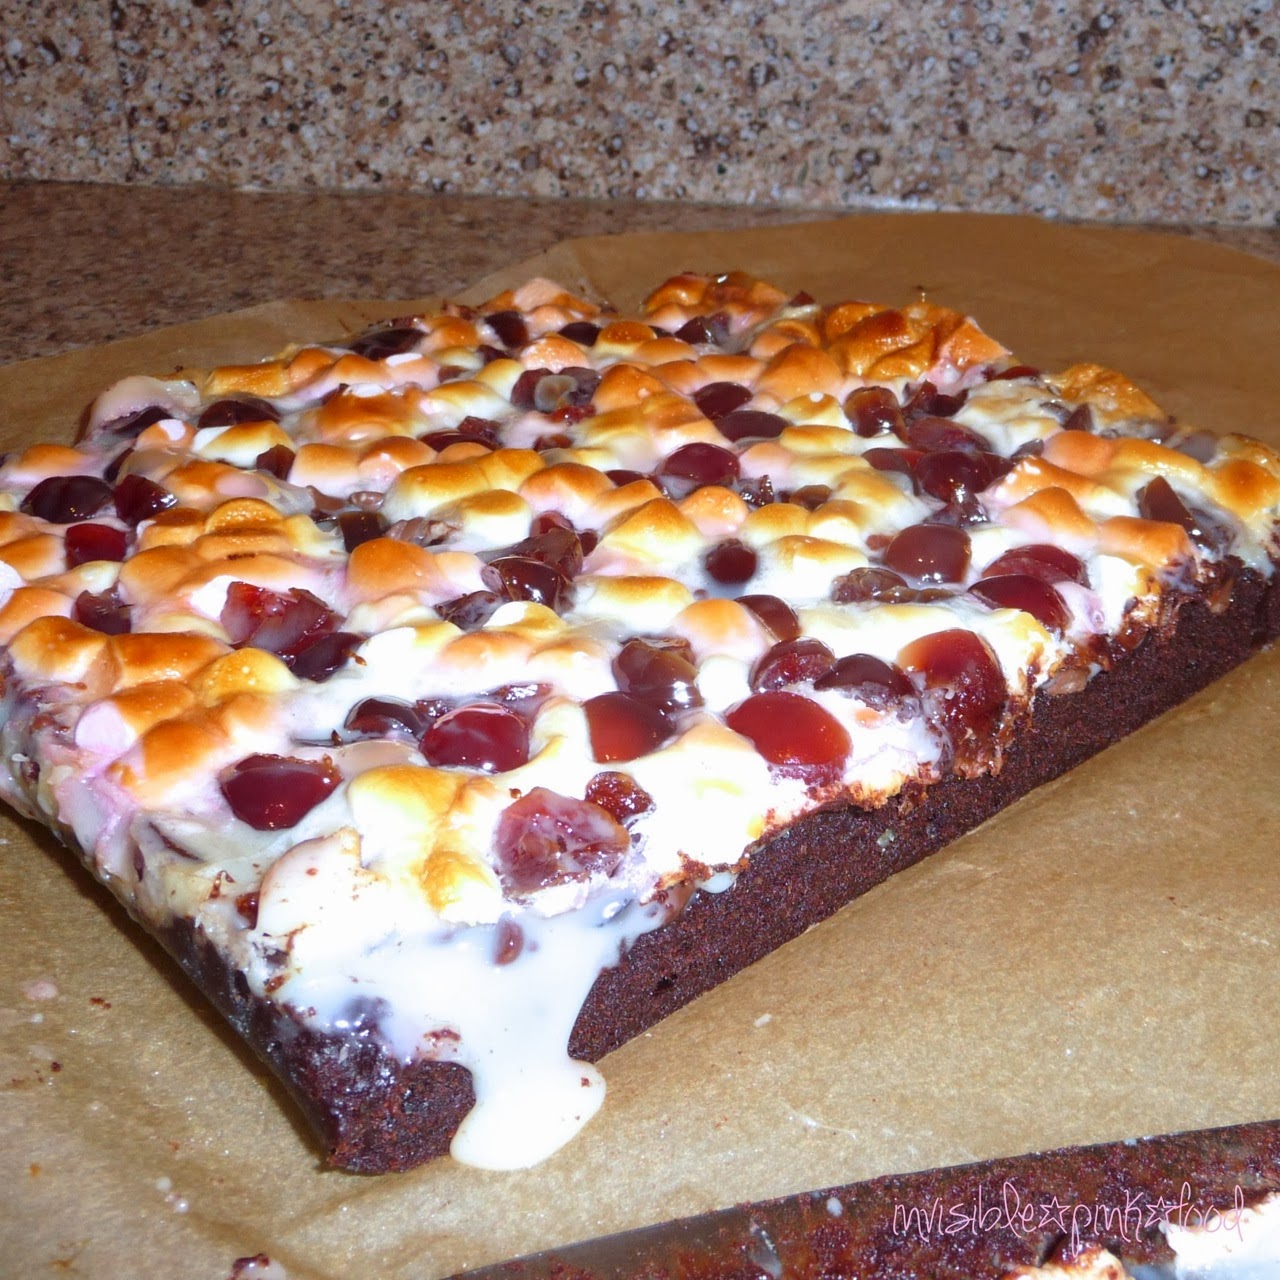
Black forest cookie bars


I guess we all accept that a person's taste preferences change over time. There are a lot of foods that you don't like as a child, but grow accustomed to. Say red wine, or olives. But how about sweet preference? I always thought there was no limit to my sweet tooth. However, over the last few years, my sweet cravings have changed. These days, I can keep chocolate around the house without immediately inhaling it in one go. I actually have quite an amazing amount of sweets in the house right now. Several very large bars of chocolate, cookies, cake, ice cream just to name a few. And I keep finding forgotten sweets in my cupboards which would never ever have happened before. Currently instead of craving chocolate, I crave fruit candy. And buns. And bread, I can't keep away from bread. And surprisingly, I have had several rather bad crisp craving moments. I never used to crave salty food. Oh, particularly tortilla chips. Mmmmm.... So I have no idea what is going on, and I am still far from getting back on track with my healthy eating, but at least I'm happy that these days my sweet tooth can be sated with a few squares of chocolate instead of a whole bar. Just keep those fruit jellies away from me. I probably shouldn't keep an open pack of fruit jellies in my car, by the way. It's a bit too easy to snack on candy while stuck in traffic and slightly annoyed and bored. So I better finish the pack I have in my car real quickly so I get rid of that temptation, right?

Onto more food related issues. There are no words to describe how much I admire all the food bloggers out there who have the skill and talent to take the most amazing photos of their food. I know a lot of it is down to things like natural light, and it's probably a bad excuse that I'm never home when there is actual daylight. What is a working woman to do? But talking about amazing food photography, I knew I had to make these black forest cookie bars as soon as I saw the photo of them pop up on Pinterest. And I don't even like cherries! (Well, to be more exact, I love fresh cherries, but have never been very fond of the glacĂ© ones). Anyhow, on to one of the most indulgent desserts ever! 

Black forest cookie bars:
1 cup (225 g) unsalted butter
1 cup cocoa powder
1 3/4 cups caster sugar
2 eggs
1/2 tsp salt
1 3/4 cups flour
1 1/2 cups chocolate chips (original recipe says semi sweet, I used milk choc)
2 cups mini marshmallows (I used  1 1/2)
1 jar glacĂ© cherries (the original recipe just states 1 jar without defining how big a jar is, the one I got was 200 g and I think that was about the right amount)
397 g (14 oz) can of sweetened condensed milk

The howto:
Preheat the oven to 180 degrees C (350 F). Butter a 23x33 cm (9x13") pan (I lined it with parchment paper instead, as that makes cleaning up much easier). In a big bowl, melt the butter. Mix with cocoa powder, sugar, eggs, salt and flour until mixture is smooth. Spread into the pan. Sprinkle chocolate chips, marshmallows and chopped cherries on top. Pour the condensed milk evenly on top. Bake for 22 minutes according to the original recipe, I baked mine for 27 minutes as the marshmallows hadn't even started to brown by 27 minutes. I'm not sure how gooey the brownie base is supposed to be, but I would be inclined to bake for another extra 5 minutes, but I think it's a matter of taste. Don't under any circumstance even try to cut while warm. Let cool completely (yes, it's hard but trust me on this one) before cutting.

The verdict:
I wasn't quite sure if I was going to blog about these brownies or not. The first time I had them, they were almost too rich (I feel bad even saying something like that, but hey, what can you do). But then I had them the next day straight out of the fridge, and I actually liked them much better. For me, for some reason they just work better when completely chilled. I also had them together with a bowl of fruit, and that was a really great combo to break the sweetness a bit. Then the Culinary Consultant poured some custard over his brownie and popped it into the microwave until slightly softened, and that worked really well.

The best thing about the brownies is that I have hardly ever come across desserts that don't make me crave more and more and more. Well, these babies will definitely leave all your sugar and chocolate cravings completely satisfied for the foreseeable future. I cut the brownies into really small squares and popped them into the freezer (When I saw the original recipe state that it serves 32, I thought that was a joke. But seriously, cut them small, trust me!). That way I can get a mini treat out whenever I feel like I need one, and it should be enough to satisfy any sweet craving I might have, but at the same time won't mean I will eat a whole cake. Not that I'm saying I would eat a whole cake... who am I kidding here... I probably could eat a whole cake if I had the chance. But the sum total is that these brownies are pretty much the ultimate sweet treat. Consume with caution, but definitely try them out if you enjoy sweet desserts.

Friday, 14 June 2013

Lemon and buttermilk bars

Guess what I just did? For the first time in weeks, maybe even months, I sat down and made a proper shopping list for our weekly grocery shopping trip tomorrow. Back in the day when I was eating healthily, I only went to the grocery store once a week. I planned the meals for every day of the weak and on Friday evening after work I headed off to tick off all those things on my shopping list. And then carried a huge backpack and two bags full of food the whole 40 minute walk home. That experience has made me appreciate having a personal chauffeur and grocery carrier with me on my shopping trips these days. Makes things much easier. Said person also wants to pick out the biggest chicken to roast, and the biggest carrots and parsnips to go with the roast. Guys are so funny sometimes.

But more importantly, creating a shopping list means life is starting to get back into the routines I love so much. I know I'm a really boring person, but I need stability in my life. And even though all the changes in my life have been really positive, I have noticed I have been incredibly stressed about it all. But now life slowly seems to settle down. The biggest things that have made me nervous are all behind. The new job is not a complete disaster. I'm still adapting and learning so much new things each day, and it's tough, but for the most part I enjoy it very much. And the whole thing with the new house has again moved a nudge in the right direction. I'm starting to adapt to living in a mancave, and have learned to accept that there is no way I will be able to clean this house to the standard I would like. But living here will only be temporary. Trying to find a way around and between all the boxes is getting more tolerable as there is almost an end in sight. Walking home from work the other day I was suddenly feeling incredibly calm and happy, something I can't remember feeling for such a long time. About six months ago, before there was a new job or house in sight, I remember thinking I really wish the next phase in my life would be something I could entitle "the calm years" in my hypothetical autobiography. And I realise saying it will probably mean there will be a major disaster looming somewhere around the corner, but for now I feel like life is good. And I think I will finally be able to make a little bit of time for cooking and blogging again. 
So, on a Friday night, what do you do when you have a craving for something sweet, half a cup of buttermilk in the fridge and two lemons? Google "lemon buttermilk" of course. And after sifting through the hits, you will end up with the perfect recipe, requiring only ingredients you have at home avoiding the tedious business of having to actually put your shoes on and walk all the way across the street to the grocery store (I'm going to enjoy it while it lasts, as there will be no grocery shop in sight once we move). Anyhows, even better if the whole recipe can be made using only one bowl and an electric mixer. The recipe is from Williams-Sonoma and I have modified it only slightly.

Lemon and buttermilk bars (serves 8):
85g unsalted butter, at room temperature
1/4 cup (60 ml) plus 2/3 cup (160 ml) granulated sugar
2/3 (160 ml) cup plus 3 Tbs. all-purpose flour
1/8 tsp. salt
2 eggs
finely grated zest from two lemons
1/3 cup (80 ml) fresh lemon juice (I used two lemons worth)
1/2 cup (120ml) buttermilk
Icing sugar for dusting
The howto:
Preheat oven to 180 degrees C/350 degrees F/gas mark 4. Using an electric mixer whip butter and 1/4 cup sugar until light and fluffy. Add the flour and salt, and mix on low speed. Press onto the bottom of a buttered pan (8 in (20 cm) square, I didn't have one so I used a 20 cm round one, and ended up with a little bit of filling left over). Bake the crust for 15-18 minutes.

While the crust is baking, prepare the filling. Grate the lemons and squeeze the juice out of them. Using the electric mixer, whip together the eggs and 2/3 cups of sugar. Add zest, lemon juice, buttermilk and mix until smooth. Pour onto the crust and bake for 25-30 minutes, until the filling has set. Let cool, dust with icing sugar and cut into squares of sections.
The verdict:
I haven't been baking very much lately, not only because most of my kitchen stuff is packed away in boxes and the bachelor pad kitchen lacks the most basic kitchen necessities, but also because the bachelor pad oven is a nightmare. I just can't bake anything in it without burning it. It's an oven which has a mind of it's own, and I'm pretty sure the inside temperature doesn't correlate in any way with what it says on the dial. Last week I baked a rather disastrous rhubarb and strawberry cake (but it turned out super delicious. I used this recipe here but added strawberries, and you can see the picture here). The cake was burned on the top (i.e. the bottom of the cake) and not baked all the way through. It was eaten nonetheless, and it was delicious and moist, but not presentable in any way. This time I decided I won't take any chances, so after the cake had been baking for the time stated in the recipe, but the filling was still jiggly, I covered it with foil to avoid it from getting too dark. I assume using a regular oven keeping to the right temperature, you won't need to extend the baking time. But the main point is, finally I managed to bake something without burning it in the oven from hell!

I absolutely loved this tart. Or bars if you prefer to call them that. It's like a lemon meringue pie without the meringue so it's much quicker and easier to make. It's very sweet though, so this is only for the true carboholics. The flavour of the lemon comes through very nicely, and the crust caramelises around the edges of the pie tin. I absolutely love that all you need is one bowl and an electric mixer, the dough for the crust will come out of the bowl cleanly, so you can just continue making the filling in the same bowl. Minimum dishes, minimum time needed in the kitchen and maximum yummy flavour.


Friday, 17 August 2012

Lingonberry chocolate bark


The lazy days of experimental cooking and becoming one with nature are over. I have returned to civilisation. And while that brings with it some good things, like being able to charge my iPad, take a hot shower and bake a pie in a proper oven, it also means not being able to watch the sun set over the lake or listen to the sound of absolutely nothing but nature. Sleeping in absolute darkness in ear numbing silence. For me the summer house is a place I enjoy for about a week or so every two years. Any longer would make me go crazy. Although, to be honest the only thing I really can't live without is the opportunity to charge my iPad. And this is not because I would be addicted to my work email or Facebook. In fact, I have very thoroughly ignored every work related email for the last seven days! It's because I have all my books on the iPad, so reading is out of the question without electricity. I'm stuck with reading my Mum's Finnish lifestyle magazines. Which are nice for the first two days, but interior design and life stories soon lose their appeal. Most of all I want my iPad because blogging and photo editing are my favourite hobbies to do in my spare time, and that becomes a bit hard without electricity. Maybe there would be a solar cell iPad charger?

Although the lazy hazy crazy days of summer are no gone, I still have one more summerhouse berry delight recipe to share. And you will have to indulge another "this is so much better in Finland" rant. Possibly the last, although I won't guarantee it. The subject of today's rant is milk chocolate. The best milk chocolate EVER is the Fazer Blue. I'm rather convinced this is not one of those "you like the one you got used to in your childhood" things. If there's one thing the Finns know, it's milk products. And I bet that even in a double blinded placebo controlled tasting, I could pick out the Blue from any other milk chocolate. Now, of course we can get into a lengthy debate of whether milk chocolate is real chocolate at all, and I know there are plenty of "if it doesn't contain 70% cocoa it's not chocolate" people out there. And I love the dark chocolates, and for some things they are the only right option. I would not dare call myself an expert when it comes to dark chocolates, and I have definitely not found my favourite. And the Finnish dark chocolates are not particularly good, I'll admit that. Same goes for white choc, there is nothing that beats Green&Black's white choc with vanilla. But milk chocolate. That I know, and the best one is Fazer. It tastes like proper chocolate, unlike other wannabe milk chocs which are sickeningly sweet and taste of cheap fats and leave a disgusting film in your mouth. I have served Blue to many non-Finns, and either they are all being very polite, but they agree that it's an unusually good milk chocolate brand. So next time you visit Finland, make sure you get a taste of this 90 year o,d traditional delicacy.

So this "recipe" (is it a recipe if it only contains three ingredients and takes two minutes of prep time?) was inspired by my overwhelming love for the best milk chocolate ever as well as my obsession with the wonderful, free and nutrient rich Finnish forest berries. And I had already eaten a huge bar of plain Blue, so I felt like I wanted to mix it up in some way.


Lingonberry chocolate bark

100 g chocolate

1 cup lingonberries

1-2 tsp vanilla sugar

The howto:

Melt chocolate. If you are in an environment where you have access to a thermometer and a device where you can control the temperature (i.e. not a wood burning stove...) tempering the chocolate might be a good idea. Pour chocolate in a container, spread the lingonberries on top and press them lightly into the chocolate. Sprinkle vanilla sugar on top. Let cool in the fridge until chocolate has set. Slice into bite sized pieces. If you didn't temper the chocolate, serve straight out of the fridge.

Non-tempered chocolate and the hot Finnish August sun...
The verdict:

Fazer has quite a selection of flavoured cholocates. In addition to the traditional nut and raisin varieties, there is a range of flavours such as peppermint crush chocolate, raspberry-cranberry chocolate, pear and almond dark chocolate, cookie crumb chocolate, fudge chocolate and this summer's newcomer freeze dried strawberry and vanilla chocolate. And all of them are good (particularly the peppermint crush and strawberry ones). But all add-ons are rather sweet in my opinion. Not saying they are too sweet, they are delicious flavour combinations. But using fresh berries instead of dried ones is soooo much better. And using a tart berry really brings out the smooth sweetness of the Blue. I loved how the lingonberries popped and squirted small sprays of lingonberry juice when I bit into them. With temeperd chocolate it would have been possible to make an even thinner bark, and I think a thinner chocolate layer would have been even better. I think any fresh berry would work well, but like I said, I think the tartness of the lingonberries goes really well with the chocolate. This is quick, simple and delicious. I guess I should add I also "disposed" of it very quickly. Maybe I should suggest this flavour combo to Fazer. Wonder if they would share a bit of the profits with me?

UK meets Finland. A glass of Pimm's by the lake, last night at the summer house.


Wednesday, 25 July 2012

Lemon crumble bars


I've had a bit of an obsession to bake with lemons lately. And when I saw this recipe (on Pinterest, of course), I knew I just had to try it. And it's practically health food. Oats - good for you. Lemon - fruit, one of your five a day. Condensed milk - dairy, good for you, your bones need the calcium. So yes practically health food.


Condensed milk is genius. Just like cans of caramel, I can't keep cans of condensed milk at home. I can just pop one open and eat it with a spoon. Throw in strawberries or raspberries. It's gooey and sugary and nauseating and absolutely delicious. Let's just ignore that a can contains pretty much my daily calorie allowance. I also love crumble, so all these oat-y, crumbly things are right down my alley. And I think there are endless variations for these bars, replace lemon with berries or fruit, add cardamom or cinnamon or heck, go crazy and add both. I bet you could mix up small pieces of cardboard in the evaporated milk and this would still be awesome. 


The recipe is stolen pretty much unaltered (apart from the addition of vanilla sugar) from GroupRecipes.


Lemon bars (16 servings):
1 can (395g) sweetened condensed milk
3 teaspoons grated lemon zest
1/4 cup fresh lemon juice


185g (1 1/4 cup) flour
95g (1 cup) oats
100g (1/2 cup) light muscovado sugar
100g (1/2 cup) butter (slightly softened) 
2 tsp vanilla sugar
1/4 tsp baking powder
1/4 tsp salt

The howto:
Preheat oven to 200 degrees. Mix condensed milk with lemon zest and fresh lemon juice. The mixture will thicken a bit. Mix the rest of the ingredients in another bowl. Press half of the crumbly mixture into a square (approximately 20x20 cm) baking tin, and bake for about 10 minutes. Spoon on the condensed milk and lemon mixture, and crumble the rest of the oat mix on top. Bake for another 15-20 minutes. Let cool, and cut into 4x4 squares.
The verdict:
In case you didn't catch my enthusiasm from the intro, I loved these bars. To be honest, I particularly loved the mixture of condensed milk and lemon. I'm thinking that could make a perfect dip for strawberries or biscuits as is. And this ended up being a problem, because I sampled the mixture quite a bit before the crust was baked, so the filling layer of the bars turned out a bit too thin to my tastes. And that might be why the bars turned out to be just a tad dry. Next time I might throw in a can and a half, so that there is enough to make a really thick layer and there would be some extra to spoon straight into my mouth. Also, I could have reduced the second cooking time a few minutes, now I baked the bars for 20 minutes, but I think 15 would be enough. If you can manage to wait, the bars tasted best when completely cooled (eaten pretty much straight out of the fridge). I made these for a friend, but ended up sampling pretty much half the batch myself. I just had to make sure they were up to standards to feed to someone else. And yes, they were.