Showing posts with label bread. Show all posts
Wednesday, 29 October 2014
Roast garlic and mozzarella bread
Today's recipe is a slight twist on the good old garlic bread. This time I decided to make garlic breads using roasted garlic. Roasting the garlic takes away that bitter harshness that raw garlic has, it's much more soft and sweet. I think it's perfect for slightly more subtle garlic bread that don't just scream "I'm a garlic bread and you will repel people for a week after eating me" but instead tempt you to devour multiple of these tasty breads and savour the soft undertones of garlic and still be able to go to work the next morning.
Roasting the garlic can be done ahead of time, even the day before. I made these for a dinner party recently, and I prepared the garlic butter in the morning, and before dinner all I needed to do was butter slices of bread, cut some mozzarella on top and bake them until golden brown. I haven't added any quantities to the recipe, as one garlic makes plenty of garlic butter (you can keep it in the fridge in a sealed jar for a few days), so you can make as many garlic breads as you need really.
Roast garlic and mozzarella bread:
1 whole garlic
about 100 g butter
slices of bread of your choice (I used a cheese bread for extra cheesiness)
thinly slized mozzarella (or grated would work as well)
The howto:
Preheat oven to 200 degrees C. Wrap the garlic in foil and roast for an hour. Let cool completely. Separate the cloves of garlic. By squeezing the garlic clove, the puree-like roasted flesh will come out of the skin (your hands will have a lovely scent of garlic after doing this, if this doesn't appeal to you, just wear disposable gloves) and mix the garlic with butter. If you use unsalted butter, add a pinch of salt. You can keep the butter in a tightly sealed jar in the fridge for a few days.
When you want to make your bread, preheat oven to 230 degrees. Cut slices of bread of choice and smear with butter (more or less depending on your taste). Top with a slice of mozzarella. Bake in the oven for 8-10 minutes until golden brown. Serve immediately.
The verdict:
I made these for a dinner party and they all disappeared very quickly. I think that's all I need to say. Are they health food? Of course not. Are they good? Oh yes. Perfect to serve with a tasty soup or as a starter.
Wednesday, 17 September 2014
Honey and oats sandwich loaf
I can't believe it's hump day already! Halfway to the weekend. The weeks just fly away, it was barely spring and now it's less than 100 days to Christmas. But rather than thinking of dark mornings and evenings ahead, let's think about happy things. Like carbs!
This recipe is adapted from the Brown Eyed Baker blog, as it was one of the first hits that came up when I googled "sandwich bread recipe oats" and I thought it looked and sounded very delicious. I saw a very special sandwich on a cooking program on telly the other day, and am dying to try it but we didn't have any bread in the house so instead of buying some substandard British supermarket bread I just thought I would make some myself.
I always convince myself baking bread is a huge hassle, so I don't do it nearly often enough. But I started this dough after getting out of bed on a Saturday morning (around 8ish), and it was out of the oven by 11.30 am, so after giving it a bit of time to cool I will have super fresh bread for our lunch sandwiches.
This is a very simple dough to throw together from ingredients you are most likely to have at home at any time (possible minus the honey, depending on if you are a big honey fan or not. I have some old honey that has started to crystallise a bit, so this recipe was a perfect way to use it up before it became completely unusable). The original recipe uses traditional oats, not the quick cook ones, and there were comments on the site saying the dough was too soggy if using quick cook oats, but I didn't have a problem, hopefully this will work for other people as well. If you use traditional oats, have a look at the original recipe, as you are supposed to soak them in boiling hot water first and then letting the mixture cool before proceeding. I made my bread exactly as described below without problems.
Honey and oats sandwich bread (makes 1 loaf):
1 cup warm water
1/4 cup warm milk
2 tsp instant (easy bake) yeast
1/4 cup honey
1 cup quick cook oats
1/2 tsp salt
2 tbsp butter (cut into small pieces)
1 cup strong whole wheat flour
1 2/3 cup strong white flour
![]() |
| Ready for the oven |
Mix the warm water, milk, yeast, oats and honey in a bowl, and leave for a few minutes. Add the butter and salt and mix. Add flour and turn onto a table and knead until a soft dough forms (this can be done by hand or using a machine. As I don't have any other options, I did it by hand. The dough is a bit soft, but after kneading this brioche bun dough, this dough was easy peasy). Leave to proof for about an hour, or until dough has doubled in size.
If using a regular bread loaf pan (9x5 in), butter it. I used my trusty silicon loaf pan, which needs no prep, I love it as it's one more step that can be omitted, making things just that little bit easier. After the dough has proved, oil your hands, and knock the air out of the dough by kneading it a few times. At this point the dough seemed really well behaved, it didn't stick and was easy to handle. Shape the dough into a log by smoothing it out to a rectangle and make a roll, tucking the ends under and rolling a few times on the table to ensure its even. There are some pictures of the process on the Browned Eyed Baker blog here if you aren't sure how to do it. Pop the loaf into the tin, and leave to proof for another hour to hour and a half (my loaf was climbing well over the edges of the loaf pan after an hour). At the end of the proofing, preheat oven to 175 degrees C (350 degrees F). Bake for 45 minutes, and protect with foil if bread starts to brown too heavily. I added 10 minutes to the baking time as the bread still felt a bit wobbly after 45 minutes. Also, it didn't become nearly as dark as the bread in the original blog post, not sure why but it turned out great nonetheless.
The verdict:
This was a very easy bread to put together and it had great rise. It was really hard to wait until it had cooled completely before sampling it. But I do urge you to wait, as the bread is really difficult to cut while the loaf is still warm (don't ask me why I know). This bread is quite sweet from the honey, so beware if you don't like sweet breads. For me it was perfect, as I do like a bit of sweetness, and it goes great with the light nuttiness of the oats. I also like that it's very soft and fluffy, not at all dense. I think it would be perfect for toasting and serving with butter and jam. I'm not sure it would be the best for sandwiches as it seems quite soft, and quite hard to cut into really thin slices. Given how little work it is to make, this is a really great, tasty and lightly textured bread which baked perfect the first time I tried it although I did make some alterations to the original recipe.
Saturday, 23 August 2014
Cinnamon swirl banana bread
Ok, so I'm not liking this whole posting only once a week thing. It always seems like an eternity since I last blogged on here. And I seem to have found my cooking mojo again. So I may go back to occasionally sneak in a mid-week post as well, depending on how things go. And I have at least two new recipes I want to try this weekend, which if they turn out to be successful, I may want to share.
Other than cooking mojo this has been a crazy week. I have been blown away by the generosity of people. In my current job, one of the things I do is co-ordinate biomedical research studies, and one aspect of that is to invite volunteers to come to the Blood Donor Centre to give a blood sample for our studies (oh and there is another study where we actually take a skin sample, but that is another story). Anyhow, I just fired up a new study, and was all of a sudden told that I need to get in 30 people before the end of September. I said there is no way in you know where that is ever going to happen. But then I got this huge tidal wave of responses from the invited volunteers, and all but two of them so far have been "yes, I would be happy to participate". So it might be we will be able to pull off a miracle and actually get 30 of them in during September. I am blown away how far people are willing to travel to come to us to participate, and how they are happy to even take a whole day off work just to come and give a blood sample. Working with these amazing people keep restoring my failing faith in humanity.
What never fails is my fascination for cake. I know it's a bit unimaginative to publish two cake recipes in a row (I hope you didn't miss my courgette and lemon bread last week). Oh wait, it's not cake, it's bread. That's ok then isn't it? Two bread recipes in a row. This little baby is where bananas go right before they would go into the bin. When they look ugly and black, but have all that lovely sweetness that will make this loaf taste heavenly.
I have used the recipe almost unchanged from the Lovin' From the Oven blog. The only change I made was to use 2 bananas instead of 3 in the original recipe. But my bananas were huge so I think they more or less were equivalent to three punier bananas. Make sure they are over ripe, that's where all the sweetness comes from. Plenty of those pesky black dots on the peel, that's how you know they are good to go. And I love that all the ingredients are basic stuff, most likely to be in your kitchen any time those bananas threaten to turn too black, to satisfy a sweet craving at any time over-ripe bananas are available. And all you need is one bowl, do a bit of a mix and it's all ready to go in the oven.
Banana bread (makes one loaf):
2 over-ripe bananas, mushed with a fork
75 g melted butter
3/4 cups sugar
1 egg
1 tsp vanilla (I used vanilla paste)
1 tsp baking soda
pinch of salt
1 1/2 cups flour
For the swirl:
1/3 cup sugar (I used muscovado)
2 tbsp cinnamon
The howto:
Preheat oven to 175 degrees C (350 F). Butter a loaf tin (I used my silicon loaf tin as it saves the trouble of preparing it). Mix the smashed bananas with the melted butter, sugar, egg and vanilla. If you want to be fancy, you can mix the soda, salt and flour in another bowl, but to save me from doing dishes, I just tossed them right in and gave a gentile stir, making sure not to over mix. Combine the ingredients for the swirl separately. Add half of the batter into the loaf tin, sprinkle over half of the cinnamon sugar and add the rest of the batter. Sprinkle the rest of the sugar on top. Bake for 50-60 minutes until a cake tester comes out clean (mine took 60 minutes to bake).
The Verdict:
I've tried a few different recipes for banana loaf. And while none of them are bad, I never felt like I really understood why others were so into banana bread. After baking this, I can honesty say I finally understand what the hype is all about. It's deliciously moist, and the cinnamon swirl and cinnamon topping go perfectly with the banana. Some banana breads I have made are too "banana-y", this is just perfectly balanced. Sweet and a touch of banana, but not overwhelming. The comment from the Culinary Consultant "You can make this banana bread any time you like". While scoffing down his slice. I could imagine adding a handful of dark chocolate chips would be perfect in the batter, but it's also heavenly as is. Oh and as usual I apologise for the suboptimal photos, but I just took a quick snap as I was very busy getting to the actual eating part. You will understand what I mean when you make it, the scent of the bread is just unbelievable!
Saturday, 16 August 2014
Courgette and lemon bread
So what have you all been up to? I know I wrote a few weeks ago about feeling like I had lost my kitchen mojo. I think just writing about it helped, as after that post, I spent almost the whole next weekend in the kitchen, making many things including this amazing bread.
I tried a recipe for courgette chocolate bread once. I didn't think I would ever say this about anything with chocolate, but it wasn't too brilliant. And it put me off courgette bread for a long time. Until I saw this Lemon Zucchini bread from My Baking Addiction when browsing the blogs I follow the other day.
I feel it was divine intervention as we have quite a crop of courgettes that need to be harvested, and I am having courgettes and tomatoes coming out of my ears (not that I'm complaining, I love them!!). I have tried a few courgette cakes in the past, and found them at best more or less average, but I thought I would try this as we both like lemon drizzle cake in this house, and I thought the lemon drizzle would add a bit of oomph to what I usually find are rather boring cakes. This is a really simple bake to put together, all you need is one bowl, a spatula and a loaf tin. I love how it's called bread instead of cake, so you don't feel like you are having a treat, just a slice of bread. And not just any bread, courgette bread which has to count towards one of your five a day.
Courgette and lemon bread (makes one loaf)
3/4 cup sugar
2 tbsp lemon zest (I used whatever zest I could get from 2 lemons)
1 large egg
1/2 cup vegetable oil (I used rapeseed)
1 tsp vanilla extract
1 1/2 cups grated courgette (packed and undrained)
1 1/2 cups all purpose flour
1/2 tsp salt
1/2 tsp baking soda
1/4 tsp baking powder
1 tsp ground cinnamon
Glaze:
1/2 cup icing sugar
1 tbsp fresh lemon juice (I had to add a bit more to make the drizzle a good consistency)
1/4 tsp vanilla extract
The howto:
Preheat oven to 160 degrees C. Butter a 8x4 in loaf pan, or line with parchment paper (or use a silicone mould like I did, they don't need any prepping). Combine sugar and lemon zest, rubbing them together with your fingers until fragrant (it makes your fingers smell amazing too!). Add egg, oil and vanilla and mix. Add courgette. In a separate bowl, mix flour, salt, baking soda, baking powder and cinnamon (I probably don't have to say I can't be bothered with this step and just mix them straight into the batter, I am too lazy to wash up an extra bowl). Add the flour mixture to the courgette batter and mix only until combined. Pour into loaf tin and bake for 50-60 minutes or until a cake tester comes out clean. Cool in the tin for about 10 minutes before turning out onto a wire rack to cool completely. For the glaze, mix all ingredients and drizzle over the bread once it's completely cooled. Store in fridge, keeps for 4-5 days.
The verdict:
I was not expecting much from this bread due to my previous experiences. But it was very tasty. It was lovely and moist, and the glaze added the perfect final touch. I ate this for breakfast at work with a cup of coffee, and we also had it for pudding. I was amazed at how moist the bread was, even after several days in the fridge. Certainly a very enjoyable way to enjoy your courgettes. And finally a recipe for courgette bread I will make again!
Saturday, 8 February 2014
Paul's eight-strand plaited loaf
I was watching my hands the other day while I was writing a blog post. I have no idea when or how it happened, but my hands look old. The skin is definitely starting to lose some of it's elasticity and it's no longer smooth like it used to be. This despite the fact that I have always treated my hands really good, I hardly ever go to sleep without giving them a good rubbing with hand cream. And I always keep hand cream in my drawer in the office as well, so I can add a bit during the day if my hands feel dry. Still all these little lines are starting to form. Then I had a look in the mirror, and I could see all these lines around my eyes as well. I still keep thinking of myself as being young, but the fact is I am starting to show my age. I have not been a twenty-something for quite a while. I'm all for people looking their age, but I would just like someone to explain to me when all of this happened? I look around on Facebook, and my friend's children are going to school now (in Finland, children go to school at 7 years old, so much later than here in the UK). How is it possible my friend's kids are growing up at the speed of light when I don't feel any older. Well, at least now I have to face the fact that although I don't feel older, I certainly look it. It just feels so strange. But I guess I have not only changed on the outside, I have changed inside my head as well. I would never want to be in my 20s again. My life has certainly got much better as I have gotten older. I feel much happier and calmer. I am lucky to have surrounded myself with wonderful friends, although many of them I don't get to see nearly as often as I would like to, but they are still there. I am learning to enjoy the things that really matter, and ignore the things that don't.
After this long and completely pointless rant, I will elegantly link the previous paragraph to this one by saying that one of the things I really enjoy is a good loaf of fresh bread. I was watching the Great British Bakeoff Sports Relief the other week and immediately afterwards got inspired to dig out my Great British Bakeoff cookbook. For a long time, I have wanted to try out Paul's eight stranded braided loaf and the other day I thought I should just go ahead and try.
Plaited loaf:
500 g strong bread flour (I only had all purpose so I added 2 tsp wheat gluten)
14 g (2x7g sachets) dried instant yeast
7 g salt
20 ml olive oil
20 ml olive oil
340 ml water
1 beaten egg with a pinch of salt added, for glazing
Weigh the flour into a bowl. Tip in the yeast and the salt but make sure they don't touch. Add the oil and mix. Then add three quarters of the water and mix. Work in the rest of the water. When the dough is coming together tip it out onto a lightly floured work surface and knead for about 10 minutes. Place back into an oiled bowl and let rise until doubled in size, about one hour.
Knock back the dough (knead it a few times to remove the air). Divide into 8 equal parts (use a scale to make it easier and more exact). Roll out to strands about 40 cm (16 in) in length. Attach one end of the strands to the work surface. Number the strands from left to right 1-8. Every time you move any strand, you need to renumber all the strands, so that the one most to the left is always number 1, the next one is number 2 and so on.
Plait as follows:
1) 8 under 7, then over 1
2) 8 over 5
3) 2 under 3, then over 8
4) 1 over 4
5) 7 under 6, then over 1
Repeat from step 2 until you get to the end of the strands and tuck the ends under the end of the loaf. I couldn't find a youtube of Paul doing the plaiting, but here is another video of how to do it if you are struggling with the instructions.
Leave the loaf to rise at room temperature on a baking sheet for about an hour. Towards the end of the hour, pre-heat your oven to 200 degrees C. Brush the risen loaf with the glaze, and bake for 20-25 minutes until golden brown and a hollow sound is heard when you tap the underside of the bread. Cool on a wire rack.
Plait as follows:
1) 8 under 7, then over 1
2) 8 over 5
3) 2 under 3, then over 8
4) 1 over 4
5) 7 under 6, then over 1
Repeat from step 2 until you get to the end of the strands and tuck the ends under the end of the loaf. I couldn't find a youtube of Paul doing the plaiting, but here is another video of how to do it if you are struggling with the instructions.
Leave the loaf to rise at room temperature on a baking sheet for about an hour. Towards the end of the hour, pre-heat your oven to 200 degrees C. Brush the risen loaf with the glaze, and bake for 20-25 minutes until golden brown and a hollow sound is heard when you tap the underside of the bread. Cool on a wire rack.
The verdict:
I was surprised that the plaiting was much easier than I thought it would be. It's just a few simple steps which are repeated over and over. The thing that was much harder though was to keep the loaf a constant thickness throughout as my strands would get thinner and thinner towards the end of the strands as they got stretched from all the action. So that is definitely something to work on next time. Other than that, it's a rather simple bread dough, just give it a good kneading and it should be fine. I think I should have kneaded mine a bit longer as the top of the braid was splitting a bit when baking.
The bread itself is a basic white loaf, tasty but the real wow factor is more in the shaping of the bread. I love the sheen it gets from the egg glazing. I ate the bread for breakfast simply toasted with a bit of butter, and we made some pulled pork sandwiches with it as well.
If you want to see how your loaf measured up with the Bakeoff loaves, have a look over here to see the British Bakeoff bakers get judged on their plaited loaves.
Saturday, 18 January 2014
Pizza dough bread
The other day, I wrote a post about Jamie Oliver's pizza dough recipe which I have taken a liking to. The great thing about it is that it also makes a really nice bread. So the last time I made pizza dough, I doubled the amount I usually make, and had enough for one pizza crust and one loaf of bread. Which actually turned out to be a rather large loaf of bread as I might have left it to rise for longer than planned due to getting lost in my little world of crafting. Talk about killing two birds with one stone, pizza dough and bread without any extra effort. The bread will proof nicely while you are baking your pizza, and once the pizza is ready the bread is ready to go into the oven. Easy and convenient and gives enough bread to feed two people for a week!
Makes enough for one large oven tray of pizza and one loaf of bread
800 g tipo '00' flour or strong white bread flour
200 g fine semolina flour
1 tsp fine sea salt
2 x 7g instant yeast sachet (about 2x2 tsp)
1 tbsp caster sugar
650 ml lukewarm water
4 tbsp olive oil
The howto:
Measure all dry ingredients in a big bowl. Add the water in small amounts while mixing with a wooden spoon. When dough is well mixed, add the olive oil. Transfer the dough onto the table and knead until smooth. Transfer back into a bowl, cover and let rest in a warm place for about an hour or until doubled in size.
Preheat the oven to 200 degrees C. After rising, knead the dough lightly. Separate half of the dough to make your pizza crust and form the other one into a loaf (or make two loaves). Slice the top of the bread a few times, and sprinkle lightly with flour. Let rise for about 40 minutes. Bake for about 45 minutes, or until knocking at the bottom of the bread with your knuckles produces a hollow sound. Let cool completely before slicing (at least in theory, in practice everyone knows it's impossible to resist warm bread straight out of the oven).
The verdict:
This recipe is a really quick and easy bread recipe. If you are making a pizza dough you might as well get twice the benefit from your efforts and make a loaf of bread at the same time and almost no extra effort. And we all know that home baked bread is more healthy than store bought, less salt and no weird additives. And nothing beats eating a few slices warm with the butter melting on the bread. The bread is light and fluffy and perfect for lunch sandwiches.
Card of the day:
This time, I got the inspiration for my card from the Simon Says Stamp Wednesday Challenge. The theme this week is emboss it, and I have a number of embossing folders I haven't gotten around to using so I thought this would be a good opportunity. As the theme for the Simon Says Stamp Monday Challenge is "Anything goes", I'm also entering that challenge.
I used a Sizzix embossing folder on Tim Holtz Tea Dye cardstock for the background. After embossing, I sanded the cardstock, inked the edges and distressed using the blades of my scissors. I used Tim Holtz Distress Paint in Antiqued Bronze on the embossing folder to stamp the background behind the sentiment, stamped the sentiment from the Tim Holtz Grunge Cirque stamp set in Tim Holtz Aged Mahogany distress ink and heat embossed using Papermania Copper embossing powder. The star is also from the Tim Holtz Grunge Cirque stamp set, and was stamped in Aged Mahogany Distress ink on scraps left over from the background for the sentiment, so the stars have some veins of the Copper Distress Paint running through them. I attached everything onto Tim Holtz Aged Mahogany cardstock.
This time, I got the inspiration for my card from the Simon Says Stamp Wednesday Challenge. The theme this week is emboss it, and I have a number of embossing folders I haven't gotten around to using so I thought this would be a good opportunity. As the theme for the Simon Says Stamp Monday Challenge is "Anything goes", I'm also entering that challenge.
I used a Sizzix embossing folder on Tim Holtz Tea Dye cardstock for the background. After embossing, I sanded the cardstock, inked the edges and distressed using the blades of my scissors. I used Tim Holtz Distress Paint in Antiqued Bronze on the embossing folder to stamp the background behind the sentiment, stamped the sentiment from the Tim Holtz Grunge Cirque stamp set in Tim Holtz Aged Mahogany distress ink and heat embossed using Papermania Copper embossing powder. The star is also from the Tim Holtz Grunge Cirque stamp set, and was stamped in Aged Mahogany Distress ink on scraps left over from the background for the sentiment, so the stars have some veins of the Copper Distress Paint running through them. I attached everything onto Tim Holtz Aged Mahogany cardstock.
Tuesday, 7 January 2014
Great pizza dough
I don't know about you, but I am too old and cynical to make New Year's resolutions. However, going through last autumn, which was rather rough especially on the job front, I realised I was focusing way too much on the things that were wrong in my life. Particularly when I was laying in bed at night I often felt overwhelmed worrying about the next day at work. I would spend the weekends worrying about the coming Monday. I would even wake up in the middle of the night worrying. This was all before I was offered my new job, things are much better now. But I also decided I can't just wait around for things to get better, I have to work on changing my life. I did a bit of reading about self help for anxiety and although I found most of the stuff out there absolute rubbish (to put it mildly) there were some good ideas as well. I guess it's all about finding what works for you.
One idea I decided to implement was to keep a happiness journal. It's pretty simple, every night when I go to bed I write something in the diary, forcing myself to identify at least one thing from the day that made me happy or that I was thankful for. Some days it has been something rather small, but I have found that most days there are several things I can easily identify. This is a nice routine that makes me think of happy things last thing in the night before I go to sleep. If later my thoughts stray to more unhappier things, I try to think of the things I just wrote about.
Another thing I have read about on several blogs is to choose one word to focus on for the year. Kind of like a mantra for the year. I guess it's about evaluating your life and thinking about what you could change to make life better. I chose the word 'cherish' for 2014. I want to live more in the moment, not worrying too much about what is to come or what has happened, but focus on the moment and cherish the good things. Like the moments in movies where time slows down. I want to find those moments next year and focus on them. Less worrying, more cherishing.
Finally on to the reason we are here for today. I like making home made pizza. There might be a place for the Italian style "really thin and crispy crust with not too much topping" type of pizzas (in my mind the only place for those would be in Italy). At home I love a pizza with loads of topping and a thick dough-y crust. With loads and loads of cheese on top. And the dough has to be just right, I don't like it if it gets too crusty and hard, it should be nice and soft and almost bread-like. I often used to put my own pizza dough together without a recipe, just estimating ingredients. Some times I would get it right, some time I would get it wrong. Then I found Jamie's pizza dough recipe, and I haven't used another one since I first tried this one. It's easy, it's quick and it turns out perfect every time. It's the perfect consistency to knead, it's not too sticky and not too dry. Jamie certainly knows what he is doing. I think the secret to success is to use the tipo '00' flour (although I have also successfully used this recipe with regular white flour) as well as the addition of semolina which adds a nice texture. The only modification I have made from Jamie's original recipe is to half it, as that makes a perfect size dough for my large oven pan for one gigantic pizza (based on the instructions in the original recipe the half serving is enough for 3-4 medium sized thin pizza bases). Also my method for mixing the dough is a bit different (and in my opinion less messy) from Jamie's, check out the original recipe if you want to follow Jamie's method. Oh and sorry again about the less-than-inspiring photos, but after all, it's a blob of dough.
Jamie's pizza dough (enough for one large pan pizza):
400 g tipo '00' flour or strong white bread flour
100 g fine semolina flour
1/2 tsp fine sea salt
1 x 7g instant yeast sachet (about 2 tsp)
1/2 tbsp caster sugar
325 ml lukewarm water
2 tbsp olive oil
The howto:
Measure all dry ingredients in a big bowl. Add the water in small amounts while mixing with a wooden spoon. When dough is well mixed, add the olive oil. Transfer the dough onto the table and knead until smooth. Transfer back into a bowl, cover and let rest in a warm place for about an hour or until doubled in size.
After rising, knead the dough lightly and roll to desired size. Top with your favourite topping. Today I used spinach, roast veg and mozzarella on my half, and chorizo, mushrooms and Stilton on his half. If you want to have a look at what I made out of this pizza dough, there is a picture on my Facebook page here. Feel free to like if you want to keep up to date with the blog.
The verdict:
This is a quick and easy pizza dough that always turns out perfect for me. You can turn it into thin based pizzas or use it for deep dish pizzas. You can even use it for bread. It's easy to knead and work, and it turns out nice and soft. I know I won't use another pizza dough recipe ever again because for me, this is the perfect pizza dough.
Card of the day:
I haven't attempted scrapbooking very much, but when I found the Penny Black Life's Messages on the lovely Kath's blog I knew it would be a perfect stamp set for scrapbooking. However, I haven't gotten around to playing with it until I decided I should make myself a nice little scrapbook page to remind me of my word for 2014. I used Baked Brown Sugar cardstock for the background and the squares. The paper is from the Stampin' Up Fan Fair DSP. I used the Gorgeous Grunge stamp set for the background. I printed and fussy cut the year and the "Cherish" expressions. I used one of the stamps from the Penny Black Life's Messages in Baked Brown Sugar. To finish, I inked using Baked Brown sugar around the edges of the background and the edges of the squares. I will attach pictures of things I cherish onto the brown squares. The page is now hanging on the wall next to my crafting table, reminding me to focus more on the good things in life this year.
I also made another scrapbook page using a black and white photo to balance the colourful background. I coloured the stamp using Stampin' Up colours Bermuda Bay, Rich Razzleberry, Melon Mambo, Pumpkin Piea and Old Olive. The stamped image was matted onto Rich Razzleberry cardstock. The background paper is from Stampin' Up DSP International Bazaar. The banners are cut from Rich Razzleberry and Melon Mambo cardstock and DSP from the Sycamore Street set. The date was stamped using the Hobbycraft alphabet typewriter clear stamp set using black Hobbycraft ink. I am quite pleased with how the projects turned out.
One idea I decided to implement was to keep a happiness journal. It's pretty simple, every night when I go to bed I write something in the diary, forcing myself to identify at least one thing from the day that made me happy or that I was thankful for. Some days it has been something rather small, but I have found that most days there are several things I can easily identify. This is a nice routine that makes me think of happy things last thing in the night before I go to sleep. If later my thoughts stray to more unhappier things, I try to think of the things I just wrote about.
Another thing I have read about on several blogs is to choose one word to focus on for the year. Kind of like a mantra for the year. I guess it's about evaluating your life and thinking about what you could change to make life better. I chose the word 'cherish' for 2014. I want to live more in the moment, not worrying too much about what is to come or what has happened, but focus on the moment and cherish the good things. Like the moments in movies where time slows down. I want to find those moments next year and focus on them. Less worrying, more cherishing.
Finally on to the reason we are here for today. I like making home made pizza. There might be a place for the Italian style "really thin and crispy crust with not too much topping" type of pizzas (in my mind the only place for those would be in Italy). At home I love a pizza with loads of topping and a thick dough-y crust. With loads and loads of cheese on top. And the dough has to be just right, I don't like it if it gets too crusty and hard, it should be nice and soft and almost bread-like. I often used to put my own pizza dough together without a recipe, just estimating ingredients. Some times I would get it right, some time I would get it wrong. Then I found Jamie's pizza dough recipe, and I haven't used another one since I first tried this one. It's easy, it's quick and it turns out perfect every time. It's the perfect consistency to knead, it's not too sticky and not too dry. Jamie certainly knows what he is doing. I think the secret to success is to use the tipo '00' flour (although I have also successfully used this recipe with regular white flour) as well as the addition of semolina which adds a nice texture. The only modification I have made from Jamie's original recipe is to half it, as that makes a perfect size dough for my large oven pan for one gigantic pizza (based on the instructions in the original recipe the half serving is enough for 3-4 medium sized thin pizza bases). Also my method for mixing the dough is a bit different (and in my opinion less messy) from Jamie's, check out the original recipe if you want to follow Jamie's method. Oh and sorry again about the less-than-inspiring photos, but after all, it's a blob of dough.
Jamie's pizza dough (enough for one large pan pizza):
400 g tipo '00' flour or strong white bread flour
100 g fine semolina flour
1/2 tsp fine sea salt
1 x 7g instant yeast sachet (about 2 tsp)
1/2 tbsp caster sugar
325 ml lukewarm water
2 tbsp olive oil
The howto:
Measure all dry ingredients in a big bowl. Add the water in small amounts while mixing with a wooden spoon. When dough is well mixed, add the olive oil. Transfer the dough onto the table and knead until smooth. Transfer back into a bowl, cover and let rest in a warm place for about an hour or until doubled in size.
After rising, knead the dough lightly and roll to desired size. Top with your favourite topping. Today I used spinach, roast veg and mozzarella on my half, and chorizo, mushrooms and Stilton on his half. If you want to have a look at what I made out of this pizza dough, there is a picture on my Facebook page here. Feel free to like if you want to keep up to date with the blog.
The verdict:
This is a quick and easy pizza dough that always turns out perfect for me. You can turn it into thin based pizzas or use it for deep dish pizzas. You can even use it for bread. It's easy to knead and work, and it turns out nice and soft. I know I won't use another pizza dough recipe ever again because for me, this is the perfect pizza dough.
Card of the day:
I haven't attempted scrapbooking very much, but when I found the Penny Black Life's Messages on the lovely Kath's blog I knew it would be a perfect stamp set for scrapbooking. However, I haven't gotten around to playing with it until I decided I should make myself a nice little scrapbook page to remind me of my word for 2014. I used Baked Brown Sugar cardstock for the background and the squares. The paper is from the Stampin' Up Fan Fair DSP. I used the Gorgeous Grunge stamp set for the background. I printed and fussy cut the year and the "Cherish" expressions. I used one of the stamps from the Penny Black Life's Messages in Baked Brown Sugar. To finish, I inked using Baked Brown sugar around the edges of the background and the edges of the squares. I will attach pictures of things I cherish onto the brown squares. The page is now hanging on the wall next to my crafting table, reminding me to focus more on the good things in life this year.
I also made another scrapbook page using a black and white photo to balance the colourful background. I coloured the stamp using Stampin' Up colours Bermuda Bay, Rich Razzleberry, Melon Mambo, Pumpkin Piea and Old Olive. The stamped image was matted onto Rich Razzleberry cardstock. The background paper is from Stampin' Up DSP International Bazaar. The banners are cut from Rich Razzleberry and Melon Mambo cardstock and DSP from the Sycamore Street set. The date was stamped using the Hobbycraft alphabet typewriter clear stamp set using black Hobbycraft ink. I am quite pleased with how the projects turned out.
Monday, 6 May 2013
Artisan no-knead bread, success finally
Woohoo, I have finally mastered the artisan no-knead bread. This recipe pops up everywhere and all the comments to all blogposts just rave about how easy and failsafe it is. Well, so far I haven't really had too much success, although I have to admit the first time I tried it I didn't have a Le Creuset to make it in. I just baked it like a regular loaf of bread, and it wasn't bad even if it didn't quite blow my mind. Then there was the disaster in the picture below. Not only did the bread not rise at all, the cheese stuck to my Le Creuset really badly. After that cheese incident I decided I would definitely use parchment paper in the future.
And now finally, I have conquered the no-knead bread. I'm not quite sure still what went wrong in the past, I think my dough might have been a bit too runny. But this time the bread finally looked like bread, nice and round with a perfect nice domed top. And surprisingly, this batch was made using brown and whole wheat flour, so I thought it would end up hard and dense, but it didn't. Admittedly after a few days, it was only nice after toasting, but it's still one of the most successful breads I have made without using any white flour. I did end up adding about a tablespoon of gluten to the dough and I think that helped a lot with the texture.
There are two really good blog posts about how to make this bread here and here. There is a huge list of questions and answers, alternative ways to bake the bread if you don't have a Le Creuset, and many options on flavouring choices. There are also much more detailed instructions for how to make the bread over on Simply So Good, so I warmly recommend you hop over there to have a look. It's a really great blog in general, so be prepared to be lost in browsing for a while.
No knead artisan bread (makes one loaf):
3 cups of all-purpose flour (I used two cups brown wheat and one whole wheat)
1/2 teaspoon instant or rapid rise yeast
And now finally, I have conquered the no-knead bread. I'm not quite sure still what went wrong in the past, I think my dough might have been a bit too runny. But this time the bread finally looked like bread, nice and round with a perfect nice domed top. And surprisingly, this batch was made using brown and whole wheat flour, so I thought it would end up hard and dense, but it didn't. Admittedly after a few days, it was only nice after toasting, but it's still one of the most successful breads I have made without using any white flour. I did end up adding about a tablespoon of gluten to the dough and I think that helped a lot with the texture.
There are two really good blog posts about how to make this bread here and here. There is a huge list of questions and answers, alternative ways to bake the bread if you don't have a Le Creuset, and many options on flavouring choices. There are also much more detailed instructions for how to make the bread over on Simply So Good, so I warmly recommend you hop over there to have a look. It's a really great blog in general, so be prepared to be lost in browsing for a while.
No knead artisan bread (makes one loaf):
3 cups of all-purpose flour (I used two cups brown wheat and one whole wheat)
1/2 teaspoon instant or rapid rise yeast
1 teaspoon salt
1 1/2 cups cool tap water
1 tbsp wheat gluten (optional)
The howto:
Mix all ingredient until a rather soggy dough forms. Let stand 12-18 hours (or a bit less or a bit more, mine usually hangs around for about 24 hours before being baked). Preheat oven to 225 degrees C (450 F) and pre-heat your enamel pot for half an hour. During that time, shape the bread into a round loaf with well floured hands and place on a parchment paper to proof until the pot has heated up. Place in pot and bake with the lid on for 30 minutes, take the lid off and bake for another 15 minutes.
1 tbsp wheat gluten (optional)
The howto:
Mix all ingredient until a rather soggy dough forms. Let stand 12-18 hours (or a bit less or a bit more, mine usually hangs around for about 24 hours before being baked). Preheat oven to 225 degrees C (450 F) and pre-heat your enamel pot for half an hour. During that time, shape the bread into a round loaf with well floured hands and place on a parchment paper to proof until the pot has heated up. Place in pot and bake with the lid on for 30 minutes, take the lid off and bake for another 15 minutes.
The verdict:
Like I said, I have finally conquered the no-knead bread. I think there has been various reasons for my failures in the past. A few times I think I have left the dough a bit too runny, it's supposed to be rather soft but you should still be able to make a round loaf out of it. A few times I haven't been able to shape the dough at all, and just ended pouring it into the pot in the form of a big blob. If that happens, try adding just a touch more flour the next time. It's a live and learn type of thing. And trust me, you will get there.
Usually when I bake bread, I like to use at least a third or so white flour, as usually heavier flours tend to result in a more dense bread, at least in my hands. Which is why I was really surprised that this bread turned out nice, soft and chewy. After a few days, it did become a bit dry and crumbly, but I used it to make a few oven-sandwiches (smother bread with mayo, add some tuna and grated cheese, and bake in the oven until the cheese has melted and is nice and golden brown). I'm so happy I finally managed to bake this bread properly, as it has really been nagging at me. Why does everyone else come up with these beautiful perfectly domed loaves and I only manage to produce horrible pancakes. This one loaf could obviously be a fluke, so I will have to try again soon to see if I can manage to repeat my success.
Card of the day:
The card of the day is a simple birthday card. I stamped the Tim Holtz hand written script using Distress Clear Embossing ink and Hobbycraft black ink with the Tim Holtz Heart n soul stamp and then heat embossed using clear powder onto ivory cardstock. I used ink blending foam and distress inks for the background, the colours are Wild honey, Worn Lipstick, Broken China, Peeled paint and Fired brick. The sentiment is from the Hobbycraft clear sentiments set, stamped using Hobbycraft black pigment ink. I added a layer of purple glittery paper for the background (I don't know the brand as I got it from a friend) and also used ink blending foam and Dusty Concord Distress ink around the edges of the sentiment. Finally I attached it all onto a white card.
Like I said, I have finally conquered the no-knead bread. I think there has been various reasons for my failures in the past. A few times I think I have left the dough a bit too runny, it's supposed to be rather soft but you should still be able to make a round loaf out of it. A few times I haven't been able to shape the dough at all, and just ended pouring it into the pot in the form of a big blob. If that happens, try adding just a touch more flour the next time. It's a live and learn type of thing. And trust me, you will get there.
Usually when I bake bread, I like to use at least a third or so white flour, as usually heavier flours tend to result in a more dense bread, at least in my hands. Which is why I was really surprised that this bread turned out nice, soft and chewy. After a few days, it did become a bit dry and crumbly, but I used it to make a few oven-sandwiches (smother bread with mayo, add some tuna and grated cheese, and bake in the oven until the cheese has melted and is nice and golden brown). I'm so happy I finally managed to bake this bread properly, as it has really been nagging at me. Why does everyone else come up with these beautiful perfectly domed loaves and I only manage to produce horrible pancakes. This one loaf could obviously be a fluke, so I will have to try again soon to see if I can manage to repeat my success.
Card of the day:
The card of the day is a simple birthday card. I stamped the Tim Holtz hand written script using Distress Clear Embossing ink and Hobbycraft black ink with the Tim Holtz Heart n soul stamp and then heat embossed using clear powder onto ivory cardstock. I used ink blending foam and distress inks for the background, the colours are Wild honey, Worn Lipstick, Broken China, Peeled paint and Fired brick. The sentiment is from the Hobbycraft clear sentiments set, stamped using Hobbycraft black pigment ink. I added a layer of purple glittery paper for the background (I don't know the brand as I got it from a friend) and also used ink blending foam and Dusty Concord Distress ink around the edges of the sentiment. Finally I attached it all onto a white card.
Friday, 1 March 2013
Pretzels
Yes, I'm still alive. But I don't blame you for thinking I suddenly disappeared off the planet given the lack of blog posts. I could come up with so many excuses. Like the fact that I have come down with woman flu. Which is soo much worse than man flu, I feel absolutely rotten. But I think I have now reached the peak of whatever this is, and my immune system is finally kicking the butt of whatever basilisks that have invaded my body. And I have another excuse for my lack of blog posts. I am totally enamoured with paper crafts right now. I have been perusing the interwebs for affordable stamps, inks, cardstock and trying out different techniques. And I have been totally overwhelmed by the card making tutorials on Youtube. I can spend hours watching stamping and inking tutorials. So you can expect a blog post or two on cards in the future. Although, I tend to get really excited about things, but then I get bored really quickly as well. But with all the money I have put on crafting supplies, I had better not ever be buying another card ever again for my whole life.
But after all those excuses, how about finally getting to the main point. I recently failed miserably in baking buns, and although I usually eat whatever I cook or bake, no matter how disgusting the end result is, this time I actually had to bin my attempt at buns. So my baking confidence was at an all time low. When I used to do horseback riding, my teacher would force me right back on the horse if I fell off, even the time I flew like a missile over my horse and right into a jump when my horse made an unscheduled stop. I knew I had to get my hands flour-y as soon as possible again to find my confidence again.
I have pinned several pretzel recipes, as I think the dark brown funny looking snake-like breads look so delicious. Also, pretzels have that wonderful pretzel-y flavour, and I wasn't quite sure where it was coming from, so I wanted to bake some myself and see if they would actually taste like pretzels or just like regular bread.
Not only did I attempt to bake these pretzels when my yeasted dough confidence was at an all time low, I baked them in the culinary consultant's kitchen. The oven is a gas oven, and we are not on good terms. I was mentally prepared for another yeasted dough disaster on my hands. One thing I did have though was good quality strong bread flour and a good quality instant yeast. So bravely, I just pulled out the recipe and got to work. The recipe I used is from the Brown Eyed Baker, and I used it without making any alterations apart from working the dough by hand instead of a Kitchen Aid, as I'm not yet in possession of such luxury items. For instructions on how to prepare the dough with the help of a Kitchen Aid or other similar food processor, head over to the original recipe.
Soft pretzels (makes 8):
1 1/2 cups (360 ml) water
1 tbsp caster sugar
2 tsp salt
2 1/4 tsp instant dry yeast (I used 2 pouches, i.e. 14 g, I was going to check how much that is in teaspoons, but forgot)
4 1/2 cups (10-11 dl) strong bread flour
4 tbsp melted butter
For boiling the pretzels:
10 cups (2.4 l) water
2/3 cup baking soda
1 egg yolk + 1 tbsp water mixed together for the egg wash
salt for sprinkling
The howto:
Mix water, sugar, salt and yeast. Add the flour and butter. Don't add all the bread flour at once, work it into the dough in batches, alternating with the butter. Leave the dough soft but not runny. Knead the dough for about 10 minutes, until it's elastic and smooth. I added a little bit of flour during the first minutes of kneading until the dough felt good in my hands. After kneading, leave the dough to rise for about an hour. As room temperature at the culinary consultant's place is quite a few degrees below normal room temperature, I turned on the oven for a few minutes to warm it up a few degrees and then left the dough in the oven to rise. After the dough has risen, start by turning on the oven to 230 degrees C. Also, fill a large saucepan with water and add the baking soda, and bring the water to a boil. Then punch the air out of the dough, and divide into eight equal parts. Roll each part out to a thin snake, and fold over itself to form the traditional pretzel shape. Boil the pretzels for 30-60 seconds before moving onto an oven plate, brush with egg wash and sprinkle with salt. Bake for about 15 minutes (mine took about 20 minutes, however this particular oven is known to be a bit inefficient), or until dark brown.
But after all those excuses, how about finally getting to the main point. I recently failed miserably in baking buns, and although I usually eat whatever I cook or bake, no matter how disgusting the end result is, this time I actually had to bin my attempt at buns. So my baking confidence was at an all time low. When I used to do horseback riding, my teacher would force me right back on the horse if I fell off, even the time I flew like a missile over my horse and right into a jump when my horse made an unscheduled stop. I knew I had to get my hands flour-y as soon as possible again to find my confidence again.
I have pinned several pretzel recipes, as I think the dark brown funny looking snake-like breads look so delicious. Also, pretzels have that wonderful pretzel-y flavour, and I wasn't quite sure where it was coming from, so I wanted to bake some myself and see if they would actually taste like pretzels or just like regular bread.
Not only did I attempt to bake these pretzels when my yeasted dough confidence was at an all time low, I baked them in the culinary consultant's kitchen. The oven is a gas oven, and we are not on good terms. I was mentally prepared for another yeasted dough disaster on my hands. One thing I did have though was good quality strong bread flour and a good quality instant yeast. So bravely, I just pulled out the recipe and got to work. The recipe I used is from the Brown Eyed Baker, and I used it without making any alterations apart from working the dough by hand instead of a Kitchen Aid, as I'm not yet in possession of such luxury items. For instructions on how to prepare the dough with the help of a Kitchen Aid or other similar food processor, head over to the original recipe.
Soft pretzels (makes 8):
1 1/2 cups (360 ml) water
1 tbsp caster sugar
2 tsp salt
2 1/4 tsp instant dry yeast (I used 2 pouches, i.e. 14 g, I was going to check how much that is in teaspoons, but forgot)
4 1/2 cups (10-11 dl) strong bread flour
4 tbsp melted butter
For boiling the pretzels:
10 cups (2.4 l) water
2/3 cup baking soda
1 egg yolk + 1 tbsp water mixed together for the egg wash
salt for sprinkling
The howto:
Mix water, sugar, salt and yeast. Add the flour and butter. Don't add all the bread flour at once, work it into the dough in batches, alternating with the butter. Leave the dough soft but not runny. Knead the dough for about 10 minutes, until it's elastic and smooth. I added a little bit of flour during the first minutes of kneading until the dough felt good in my hands. After kneading, leave the dough to rise for about an hour. As room temperature at the culinary consultant's place is quite a few degrees below normal room temperature, I turned on the oven for a few minutes to warm it up a few degrees and then left the dough in the oven to rise. After the dough has risen, start by turning on the oven to 230 degrees C. Also, fill a large saucepan with water and add the baking soda, and bring the water to a boil. Then punch the air out of the dough, and divide into eight equal parts. Roll each part out to a thin snake, and fold over itself to form the traditional pretzel shape. Boil the pretzels for 30-60 seconds before moving onto an oven plate, brush with egg wash and sprinkle with salt. Bake for about 15 minutes (mine took about 20 minutes, however this particular oven is known to be a bit inefficient), or until dark brown.
The verdict:
I'm happy to report that the total loss of my baking abilites seemed to be reversible, and after a disastrous enriched dough, I was compensated with an absolute perfect pretzel dough. It was easy to knead, it didn't stick and it was easy to roll to shape and form the pretzels. It rose to gigantic heights during the proofing, and it baked to form soft and chewy pretzels. I am starting to be more and more convinced that there is a huge difference in the flours that are available. I always used to buy the really cheap flours thinking there can't be much of a difference between brands of flour. But the two best breads I have ever baked, these pretzels and this bacon and cheddar bread, have been baked from more expensive flour and the texture of the dough has been totally different and much easier to handle than my yeasted doughs usually are. Or maybe watching Paul knead that dough so many times has rubbed off on me.Saturday, 26 January 2013
Bacon and cheddar bread
My very one sided love affair with Paul Hollywood continues. I keep browsing through his book and I want to bake every single bread in there. I thought this was a really nice and manly bread, so I baked it for my Chief Culinary Consultant. Come to think of it, I have been cooking loads of things with bacon lately. Like this man pleasing chicken, and these amazing cooked sprouts. Guess that's what happens when you hang out with a guy. No wonder I have put on a buttload of weight. Literally. Oh and a tummyload as well. But much more important than my ever expanding physical presence, this is without a doubt the best bread I have ever made. And after doing proper yeasted doughs a few times, I'm not at all intimidated by them anymore. It's not at all as hard as you would think. And kneading the dough can be quite relaxing.
Manly bread (makes two loaves):
400 g strong white bread flour
100 g strong wholemeal bread flour
30 g softened butter
10 g instant yeast
1 tsp salt (the original recipe says 10 g salt, which would be around 1.5 tsp, but I think with the cheese and bacon, this was more than enough)
330 ml water
6 rashers of bacon
150 g cheddar
The howto:
Mix flour, yeast, salt, butter and three quarters of the water. Mix with your fingers until all ingredients are incorporated. Add more water if needed. You want a soft but not soggy dough. Knead on a lightly floured surface for 5-10 minutes until the dough is soft and forms a smooth skin. Let rise for at least an hour. In the meantime, cook the bacon, let cool and chop finely. Grate the cheese. When the dough has at least doubled in size, punch the air out of the dough, and knead in the cheese and bacon. Form into two loaves and slash deeply lengthwise. Let rise for another hour. Meanwhile, preheat the oven to 220 degrees C. When loaves are done rising, bake for about 20 minutes, or until golden brown. Eat warm.
The verdict:
This is the first time I think I have managed to make really great bread. The texture of the dough turned out perfect. I didin't use all the water, but the dough was still nice and soft. I took my time kneading it, and actually, it's not all that hard work if the texture of the dough is right. You need to put some effort into it, but it's really enjoyable. Also, the dough didn't stick to the table or my hands at all. And I could really feel the change in the dough as the gluten started to develop, and the dough became more stretchy and smooth. It rose beautifully. This could also be because I bough myself a fresh pack of yeast as I wasn't so sure my previous one wasn't going a bit ancient on me. I'm really bad with throwing away any cooking ingredients, but I guess old yeast is really useless, so give yourself a chance to succeed with yeasted doughs and buy fresh yeast. Also, remember that not all dry yeasts are equal. Active yeast is different from instant (or bread machine) yeast. Active yeast needs to be activated in warm liquid to make it functional, whereas instant yeast can be mixed directly with the dry ingredients. For more info see here.
I managed to bake the bread nicely, it got a golden crust, and it was really soft and spongy with a bit of a crust. The bacon and cheddar are both strong flavours, so it was really tasty. I served it with a side of omelette, and it seemed to go down well with the target audience. And I loved it too, I love bacon so much that I often think I should have been born a man. Although I do love my chocolate too... maybe I am some sort of hermaphroditic life form?
Manly bread (makes two loaves):
400 g strong white bread flour
100 g strong wholemeal bread flour
30 g softened butter
10 g instant yeast
1 tsp salt (the original recipe says 10 g salt, which would be around 1.5 tsp, but I think with the cheese and bacon, this was more than enough)
330 ml water
6 rashers of bacon
150 g cheddar
The howto:
Mix flour, yeast, salt, butter and three quarters of the water. Mix with your fingers until all ingredients are incorporated. Add more water if needed. You want a soft but not soggy dough. Knead on a lightly floured surface for 5-10 minutes until the dough is soft and forms a smooth skin. Let rise for at least an hour. In the meantime, cook the bacon, let cool and chop finely. Grate the cheese. When the dough has at least doubled in size, punch the air out of the dough, and knead in the cheese and bacon. Form into two loaves and slash deeply lengthwise. Let rise for another hour. Meanwhile, preheat the oven to 220 degrees C. When loaves are done rising, bake for about 20 minutes, or until golden brown. Eat warm.
The verdict:
This is the first time I think I have managed to make really great bread. The texture of the dough turned out perfect. I didin't use all the water, but the dough was still nice and soft. I took my time kneading it, and actually, it's not all that hard work if the texture of the dough is right. You need to put some effort into it, but it's really enjoyable. Also, the dough didn't stick to the table or my hands at all. And I could really feel the change in the dough as the gluten started to develop, and the dough became more stretchy and smooth. It rose beautifully. This could also be because I bough myself a fresh pack of yeast as I wasn't so sure my previous one wasn't going a bit ancient on me. I'm really bad with throwing away any cooking ingredients, but I guess old yeast is really useless, so give yourself a chance to succeed with yeasted doughs and buy fresh yeast. Also, remember that not all dry yeasts are equal. Active yeast is different from instant (or bread machine) yeast. Active yeast needs to be activated in warm liquid to make it functional, whereas instant yeast can be mixed directly with the dry ingredients. For more info see here.
I managed to bake the bread nicely, it got a golden crust, and it was really soft and spongy with a bit of a crust. The bacon and cheddar are both strong flavours, so it was really tasty. I served it with a side of omelette, and it seemed to go down well with the target audience. And I loved it too, I love bacon so much that I often think I should have been born a man. Although I do love my chocolate too... maybe I am some sort of hermaphroditic life form?
Sunday, 25 November 2012
Paul I heart you!!!
I might have mentioned in passing my obses... I mean fascination with The Great British Bakeoff. Yes, I know the season ended ages ago (and I was sooo happy for John when he won, he seems like such an adorable and lovely guy). Anyhows, after watching the bakers produce the most beautiful yeasted doughs, I decided I really need to hone my bread making skills. Well, technically speaking, I shouldn't as I'm at least in theory still trying to shed some pounds before Xmas. However, I couldn't resist when I saw Paul Hollywood's book "How to bake" on Amazon's black friday sale. Damn you one click shopping! And damn you Paul for your foxxy good looks, making kneading dough look so sexxy.
The minute I had the book in my hands, I just had to flip through it from front to back. Yes, I was at work. But in my defence, it was my coffee break. The book is absolutely wonderful, with good instructions and beautiful pictures. Quite a lot of it covers yeast doughs, starting from basic breads, going on to flavoured breads and there is even a whole chapter on sourdoughs. When I get back from my Xmas holiday I will set up my own sourdough starter and try that method as well. In addition to breads, there are really good instructions for pastry, brioche, croissants, danishes, and lots of cakes and puddings. The book is just full or wonderful recipes which look absolutely delicious and I want to try them all. Particularly the breads.
I'm a bit bad with yeast doughs as I don't always have the patience for the long rising times. When I bake, I want to see the results immediately. And I have always been really lazy with kneading, I have always found it messy and extra work that I couldn't be bothered with. But at the same time, I absolutely love bread, and there are no decent bakeries at all in Cambridge, so if you want good bread you have to bake it yourself. So I'm looking forward to improving my bread making skills.
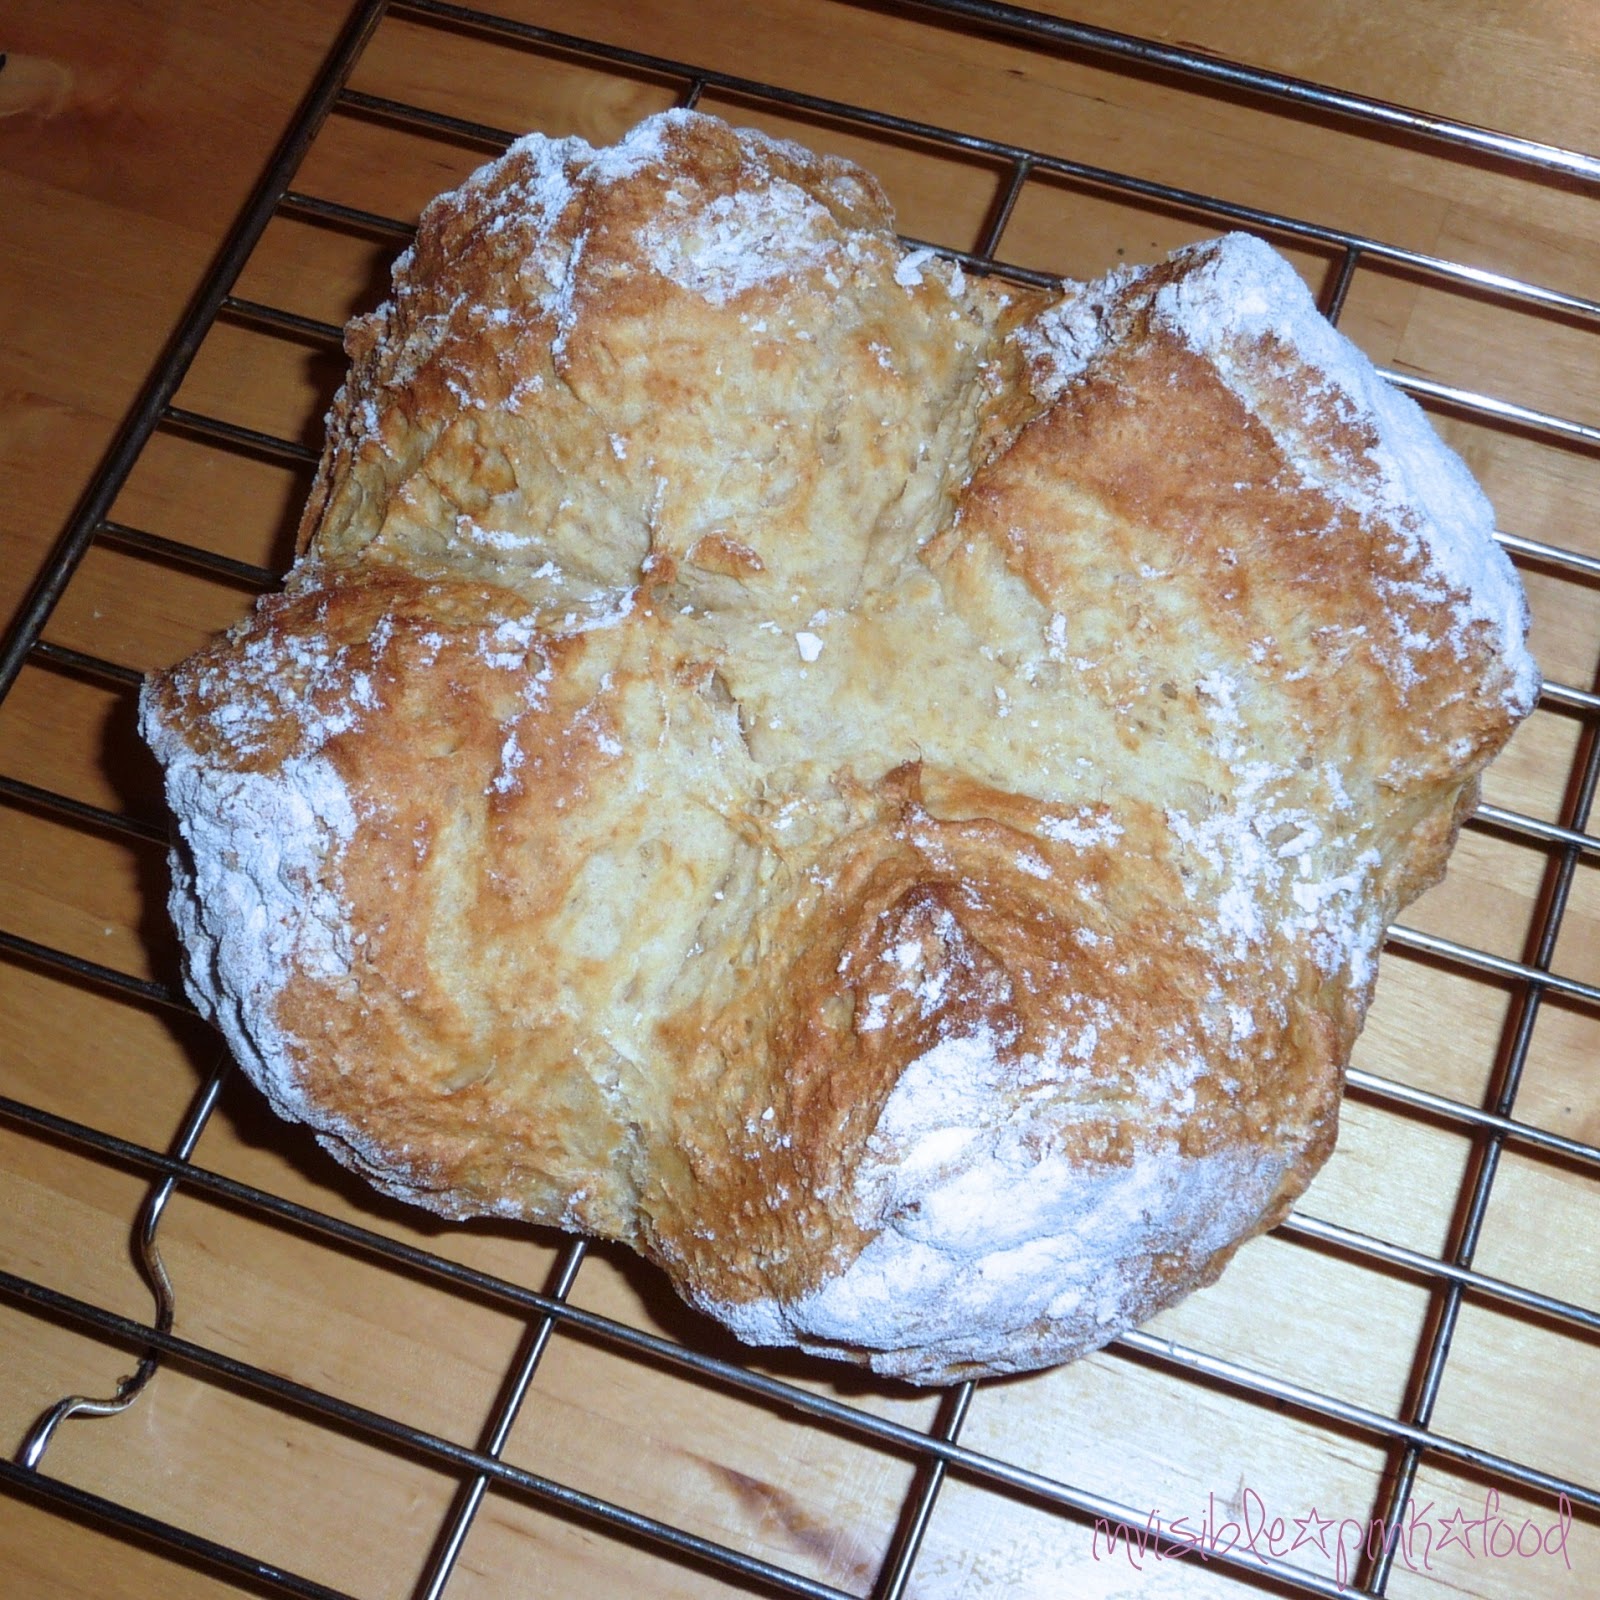
To get me in the bread mood, before attacking the yeasted doughs, I decided to try one of the few non-yeast based recipes for a super quick soda bread. In my local store they sell buttermilk in 300 ml jars, so I slightly modified the amounts of ingredients in the recipe. I included the original amounts in parenthesis for a slightly larger loaf.
Paul Hollywood's Soda Bread:
375 (500) all purpose flour
3/4 (1) tsp salt
3/4 (1) tsp bicarbonate of soda
300 (400) ml buttermilk
The howto:
Preheat oven to 200 degrees C. Mix dry ingredients, add buttermilk and mix with your hand or a wooden spoon until the dough sticks together. Shape the dough into a ball, and flatten it a bit with your palm. Put the bread on a parchment paper lined baking tray, and mark it into quarters by cutting deep, but not all the way through. Bake for about 30 minutes, or until golden brown and making a hollow sound when tapped on the bottom.
The verdict:
This is a super quick bread to whip together, I made it for evening tea with Best Friend. We ate it pretty much straight out of the oven with just butter on top with some hot tea and lots of gossip. Perfect Saturday evening.
Preparing the bread takes just a few minutes, so it would also be perfect for weekend brunch. It seems pretty much foolproof, as it turned out absolutely beautiful. It rose much more than I expected. It was soft and tasted really nice. It somehow reminded me of some oat cakes my mum used to make, whether or not they actually had soda in them I can't remember, but the scent of the bread was exactly as I remember the oatcakes. So I think next time I will try to replace some of the flour with oats.
Subscribe to:
Posts (Atom)


